How To Remove Garage Door Springs

Need help removing your garage door springs? In this post, you’ll find instructions on how to remove your garage door springs.
Be aware that attempting to remove your garage door springs can be very dangerous and not the type of project that should be done by an inexperienced DIYer. More experienced DIYers should use extreme caution and not work alone when attempting to remove garage door springs.
Garage door repairs are best left to professionals, many companies (including ours) offer same day repair services, don’t hesitate to call if you have any problems with your garage door or springs.
Check out the symptoms of a failing garage door spring below or skip ahead for instructions on removing extension or torsion springs.
Table of Contents
ToggleSymptoms of Failing Garage Door Springs
Most garage doors are used regularly so it makes sense that eventually, one part or another will start to give. Springs play a larger role in smoothly lowering and raising the garage door itself than the opener’s motor. The springs handle the weight of the whole system, knowing how to identify failing springs will save you a major headache and a potentially dangerous situation.
Worn springs may snap under pressure sending the spring flying or causing the door to slam down abruptly.
4 Signs of Failing Springs
1 – The Door “Weighs” More
Springs support the weight of the door if the door becomes dead weight the springs are worn out. You may “hear” the difference or “see” the difference if the door goes down more quickly than usual.
2 – Loose Garage Door Cables
If the cables on your garage door are slack, there is a problem with the springs. Tightly wound springs should keep the springs taught.
3 – Gaps in the Spring
Functioning springs should be tightly and neatly wound. Failing springs have gaps or warping, replace the springs before they break.
4 – The Door is Crooked
When the door is out of balance, the springs need to be checked. Doors with two springs should have springs that provide equal support to the door. When one spring is broken or damaged the door will not open evenly (if it opens at all).
If you notice any of these symptoms contact a garage door expert and to schedule a spring replacement as soon as possible.
How Do I Remove My Garage Door Springs?
If you are replacing your existing garage door or springs you need to make sure to purchase the correct replacement parts. The garage door must be supported by the right springs. Spring size and strength are determined by the weight of the door. For help finding the correct spring size contact a garage door company, in addition to providing repair services many companies also sell parts.
Practice Caution: There is extreme tension in the springs and any sudden or uncontrolled release of the springs could cause serious injuries.

How To Remove Garage Door Torsion Springs
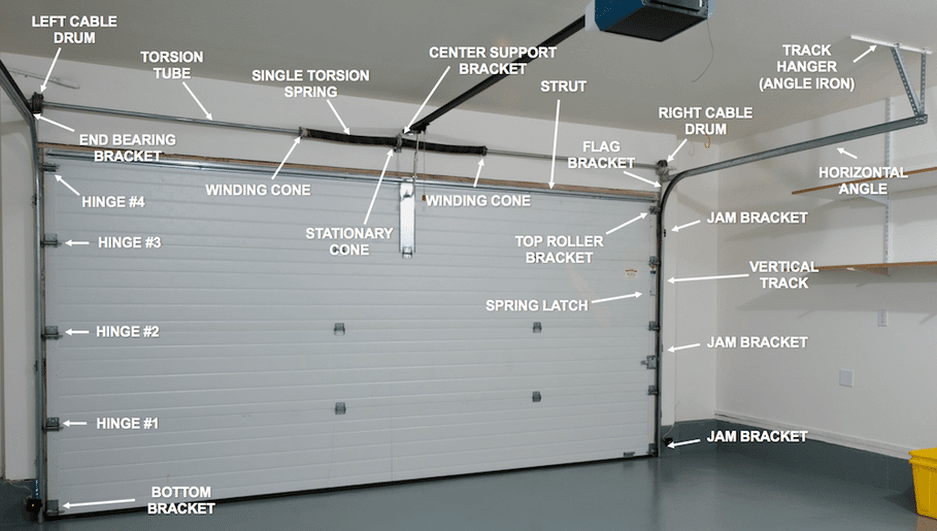
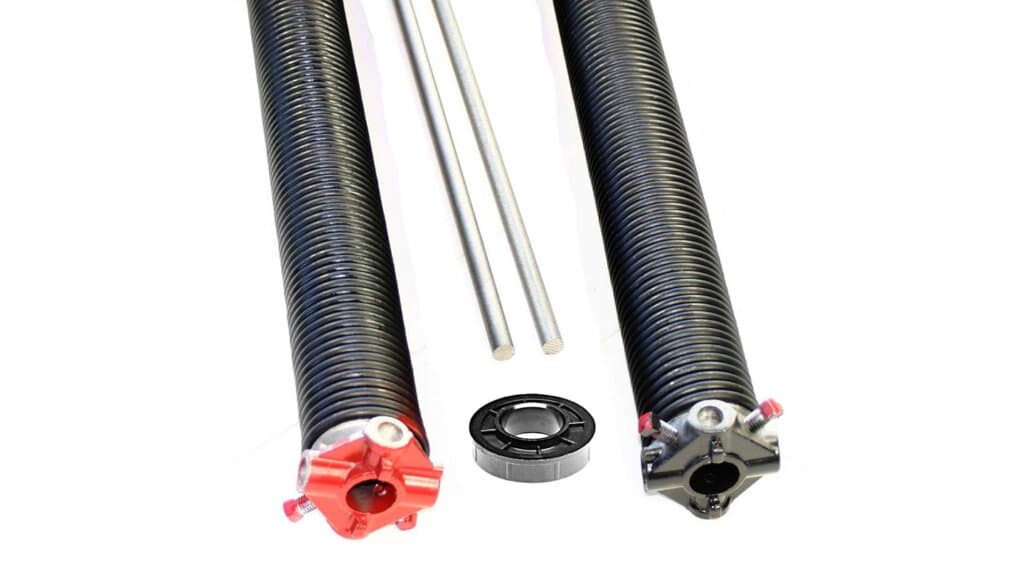
Torsion springs are located above the garage door opening attached to the header. This type of spring is always under tension, the tension has to be relieved before they can be removed.

BEFORE YOU BEGIN: If you suspect the spring on your door is broken, do not disconnect the opener while the door is open. Disconnecting the door opener while the door is open can cause the door to fall down under its full weight–this can be extremely dangerous. Make sure the door is completely on the ground before you begin the process to remove the spring(s).
TOOLS
- 2 Winding Bars – DO NOT USE A SCREWDRIVER AS AN ALTERNATIVE
- Vice Grips
- Wrenches (9/16, 1/2 and 7/16 inches, 3/8-inch square head, or eight-point socket)
Torsion Spring Removal Steps
Part One
1 – Make sure the door is CLOSED.
You can also lock the door in this position while you work on removing the springs.
2 – Block the Spring Shaft with Locking Pliers
Lean the pliers against the wall.
Part Two
3 – Unscrew the Set of Screws in the Winding Cone
Begin by inserting one of the winding bars into one of the holes of the winding cone. Hold the bar FIRMLY towards the top and unscrew the screws in the winding cone. Loosening the screws will relieve the tension from the spring and shift it to the winding bar, hold the bar tightly to prevent suddenly releasing the spring.
4 – Unwind the Spring
Slowly unwind the spring towards you and insert the winding bar in the hole at the top of the winding cone. After securely inserting the top winding bar remove the lower bar and unwind the spring towards you. Repeat this process until there is no tension left in the spring.
Repeat these steps for any additional springs.
5 – Disconnect the Springs from the Center Bracket
Remove the nuts and bolts that fasten the stationary cones to the center bracket.
6 – Secure the Torsion Shaft in Place
Clamp locking pliers or vice grips to the center bracket to prevent the torsion shaft from dropping while you remove the old springs.
7 – Disconnect the Lift Cables
Loosen the screws on the left and right cable drums and remove the cables. Slide the drum toward the center of the torsion bar. Repeat on the other side of the garage.
8 – Remove the Torsion Spring(s)
Slide the torsion shaft toward the center of the garage door and remove the drum. After removing the drum you can slide the (first) spring off. Repeat if needed for the other side.
How To Remove Garage Door Extension Springs
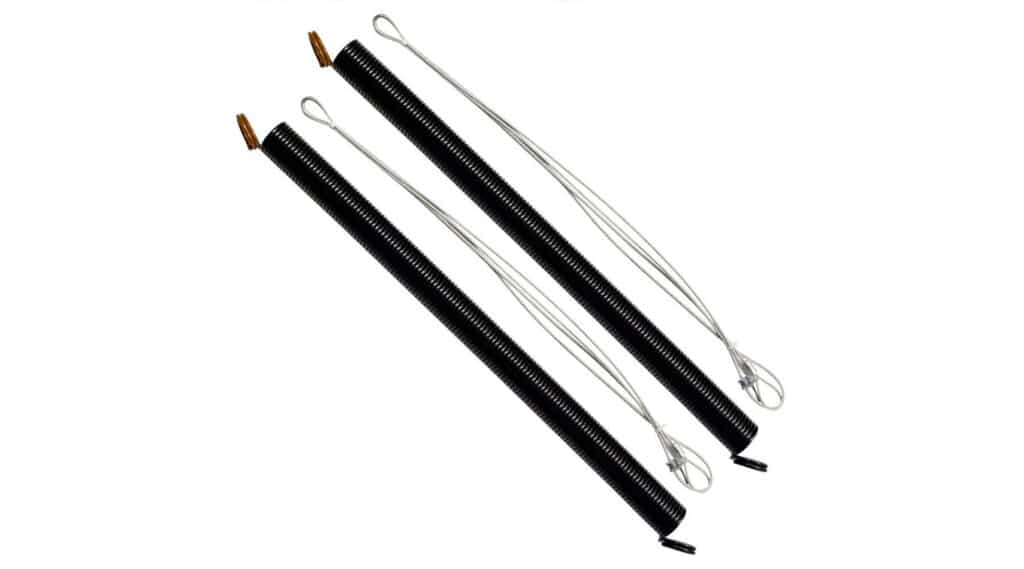
Garage doors that don’t have torsion springs should have extension springs instead. Extension springs are located on each side of the garage door above the upper tracks.

TOOLS
- 2 Vice Grips
- Pliers
- Socket Wrench
- Crescent Wrench
- Philips Head Screwdriver
- Duck Tape
- Step Stool
- 6’ Ladder
Extension Spring Removal Steps
Part One
1 – Lift the Door Completely
When the garage door is down the springs are extended and loaded with tension. Lift the door completely to release the tension.
2 – Block the Door in an Open Position
Place a vice grip on each side of the track just below the lower roller. You can also place a ladder under each side of the door to provide additional support, weak vice grips can give out under the weight of the door.
3 – Unplug or Disengage the Door Opener
Pull the red cord to disengage the door opener or unplug the electric opener from the outlet.
Part Two
4 – Release Remaining Tension from the System
The extension cable has an S-hook located at the end of the cable. The S-hook is attached to a slot on the angle bracket. Use a piece of tape to mark the hole that was used by the S-hook.
5 – Remove the Spring Pulley
Remove the spring pulley by unscrewing the axle bolt. Tip: Tape the pulley to the cable so you remember the proper configuration later.
6 – Remove One End of the Extension Spring
Remove the end of the extension spring that is hooked onto the attachment hook. The attachment hook is bolted to the back hanger bar.
7 – Disconnect the Safety Cable
Disconnect the safety cable from the front end (near the door opening). Feed the cable through the spring to remove the spring.
After Removing The Springs
You’ll be ready to replace the existing springs with new ones. You may also need to replace existing cables. Schedule a consultation with a pro before you begin if you are unsure of the condition of your springs or cables. A garage door expert can diagnose your problem and offer solutions including repair, replacement, or product recommendations.
Contact us to schedule a consultation or repair service with our team at Heritage Garage Door. We proudly serve homeowners in Southern California.


