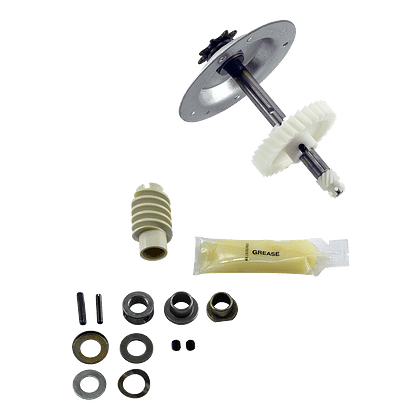
Garage Door Operator Drive Gear Assembly Replacement
Learn how to replace your garage door operator drive gear by following the instructions in this guide. We’ll start with a few basics and then the assembly replacement process.
Signs the drive gear needs to be replaced
Let’s start with the understanding that the drive belt and gears in your garage door operator won’t last forever. Eventually, the belt and gears will wear out. There are two signs you will need to watch for:
- The operator sounds like it’s running, but it’s not opening or closing the door
- Shavings from worn-out gears are visible when you remove the operator’s cover
What causes the drive gear to wear out?
Most homeowners open their garage door multiple times a day, so regular wear-and-tear is a likely culprit, but that’s not the only cause. Other problems with the garage door system can cause excess wear on the drive gear. Think of the operator as the heart of the system; if another part of the system struggles, it causes more stress on the drive gear.
- Operating a door with damaged springs
- Operating an unbalanced door
- Worn out cables
- Damaged track or rollers
Make sure to address any additional problems when you replace the drive gear. Ignoring other issues will result in more problems. If possible, take care of all the issues at once.
Which LiftMaster drive gear kits are available?
There are several gear kits available. Right now, we’ll introduce you to a few. Before we get into the three LiftMaster kits, note that some kits are interchangeable across brands. If you have already purchased a kit, look at the documentation before you begin. Also, read the directions thoroughly before deciding to repair on your own. If you think you might need assistance, you can always contact a garage door company near you.
- LiftMaster 41A281
- LiftMaster 41A4885
- LiftMaster 41A4885-2
- LiftMaster 41A4885-5
- LiftMaster 41C422
41A281: Works on chain-drive gear assemblies and does not require removal of the entire housing
41A4885: Works for belt-drive and ATS operators
41A4885-2: Works for belt-drive garage door openers, 1984-2001
41A4885-5: Works for belt-drive openers, 2002-present
41C422: Works for all chain-drive gear assemblies, 1984-present
As with any product, using the correct parts is crucial for the operation and maintaining a valid warranty. Be sure to check your manual if you have any doubts.
Guide: How to assemble a garage door operator drive
Warning: To prevent possible serious injury or even death from electrocution, always disconnect the power cord from your garage door from the outlet before proceeding with any inspection or repair. This guide is not a replacement for the directions provided in your manual or kit.
Here are a few tools you’ll want to have handy during this project:
- Hammer
- ½” wrench or adjustable wrench or pliers
- 3/8″ Socket or Nut Driver
- 1/4″ Socket or Nut Driver
- 5/16″ Socket or Nut Driver
- Screwdriver
- 5/32″ Punch or similar
- Drive pins
Assembly guide for the LiftMaster 41C422 gear kit
Steps 1-4
One: Turn off the power to the garage door and pull the manual release. The door should be in a closed position while you work. Attach vice grips to the trolley to limit movement.
Two: Use the ½” wrench to loosen the nuts on the garage door opener trolley. Loosening the assembly will allow you to give the chain some slack.
Three: A plastic clip is on the shaft’s bottom; press the clasp to remove the plastic gear. Then remove the screws that hold the housing to the operator.
Four: Remove the assembly to expose the worm gear on the motor’s drive shaft.
Steps 5-9
Five: Check if the RPM sensor needs to be replaced.
Six: Remove the clip that holds the washers and housing in place on the drive shaft. Next, remove the washers and the metal collar.
Seven: Slide the motor out and replace the worm gear. Next, set the motor in place and put on the new metal collar.
Eight: Secure the motor by tightening the bolts, then put the washers and set the pin back on the drive shaft.
Nine: Put the RPM-sensor cap back on at the end of the motor shaft.
Steps 10-12
Ten: On the new gear, remove the lower plastic clip and small gear from the new unit, then lower it into place.
Eleven: Secure the housing to the operator’s head and put the new small drive gear on by setting the plastic clip into position.
Twelve: Spread the lubricant (included in the kit) around the gears and rotate them using the RPM-sensor cap.
You are done after you reinstall the chain and tighten up the system. Remove the vice grips and ensure no one is around the door so you can test it. If you need to adjust, use the travel adjustments screws to make fine adjustments.


